:-)
Yes, if you're an UNIXER... Command Line Maniac or Terminal Minded :-D, and happy when you're typing tail -f | grep bla bla bla?
hohoho, can we have it on Windows Server 2003 and or XP ? absolutely you can!
tail -f mylog.txt | qgrep "hello"
You want more? download it and explore it ;-)
download from http://www.microsoft.com/windowsserver2003/downloads/tools/default.mspx
and you will have additional command under C:\Program Files\Windows Resource Kits\Tools\:
Acctinfo.dll (documented in Readme.htm)
Adlb.exe: Active Directory Load Balancing Tool
Admx.msi: ADM File Parser
Atmarp.exe: Windows ATM ARP Server Information Tool
Atmlane.exe: Windows ATM LAN Emulation Client Information
Autoexnt.exe: AutoExNT Service
Cdburn.exe: ISO CD-ROM Burner Tool
Checkrepl.vbs: Check Replication
Chklnks.exe: Link Check Wizard
Chknic.exe: Network Interface Card Compliance Tool for Network Load Balancing
Cleanspl.exe: Spooler Cleaner
Clearmem.exe: Clear Memory
Clusdiag.msi: Cluster Diagnostics and Verification Tool
Clusfileport.dll: Cluster Print File Port
Clusterrecovery.exe: Server Cluster Recovery Utility
Cmdhere.inf: Command Here
Cmgetcer.dll: Connection Manager Certificate Deployment Tool
Compress.exe: Compress Files
Confdisk.exe: Disk Configuration Tool
Consume.exe: Memory Consumers Tool
Creatfil.exe: Create File
Csccmd.exe: Client-Side Caching Command-Line Options
Custreasonedit.exe: Custom Reason Editor (documented in Readme.htm)
Delprof.exe: User Profile Deletion Utility
Dh.exe: Display Heap
Diskraid.exe: RAID Configuration Tool
Diskuse.exe: User Disk Usage Tool
Dnsdiag.exe: SMTP DNS Diagnostic Tool (documented in Readme.htm)
Dumpfsmos.cmd: Dump FSMO Roles
Dvdburn.exe: ISO DVD Burner Tool
Empty.exe: Free Working Set Tool
Eventcombmt.exe: Check Replication
Fcopy.exe: File Copy Utility for Message Queuing
Frsflags.vbs
Getcm.exe: Connection Manager Profile Update
Gpmonitor.exe: Group Policy Monitor
Gpotool.exe: Group Policy Objects
Hlscan.exe: Hard Link Display Tool
Ifilttst.exe: IFilter Test Suite
Ifmember.exe: User Membership Tool
Inetesc.adm: Internet Explorer Enhanced Security Configuration
Iniman.exe: Initialization Files Manipulation Tool
Instcm.exe: Install Connection Manager Profile
Instsrv.exe: Service Installer
Intfiltr.exe: Interrupt Affinity Tool
Kerbtray.exe: Kerberos Tray
Kernrate.exe: Kernel Profiling Tool
Klist.exe: Kerberos List
Krt.exe: Certification Authority Key Recovery
Lbridge.cmd: L-Bridge
Linkd.exe
Linkspeed.exe: Link Speed
List.exe: List Text File Tool
Lockoutstatus.exe: Account Lockout Status (documented in Readme.htm)
Logtime.exe
Lsreport.exe: Terminal Services Licensing Reporter
Lsview.exe: Terminal Services License Server Viewer
Mcast.exe: Multicast Packet Tool
Memmonitor.exe: Memory Monitor
Memtriage.exe: Resource Leak Triage Tool
Mibcc.exe: SNMP MIB Compiler
Moveuser.exe: Move Users
Mscep.dll: Certificate Services Add-on for Simple Certificate Enrollment Protocol
Nlsinfo.exe: Locale Information Tool
Now.exe: STDOUT Current Date and Time
Ntimer.exe: Windows Program Timer
Ntrights.exe
Oh.exe: Open Handles
Oleview.exe: OLE/COM Object Viewer
Pathman.exe: Path Manager
Permcopy.exe: Share Permissions Copy
Perms.exe: User File Permissions Tool
Pfmon.exe: Page Fault Monitor
Pkiview.msc: PKI Health Tool
Pmon.exe: Process Resource Monitor
Printdriverinfo.exe: Drivers Source
Prnadmin.dll: Printer Administration Objects
Qgrep.exe
Qtcp.exe: QoS Time Stamp
Queryad.vbs: Query Active Directory
Rassrvmon.exe: RAS Server Monitor
Rcontrolad.exe: Active Directory Remote Control Add-On
Regini.exe: Registry Change by Script
Regview.exe (documented in Readme.htm)
Remapkey.exe: Remap Windows Keyboard Layout
Robocopy.exe: Robust File Copy Utility
Rpccfg.exe: RPC Configuration Tool
Rpcdump.exe
Rpcping.exe
RPing: RPC Connectivity Verification Tool
Rqc.exe: Remote Access Quarantine Client
Rqs.exe: Remote Access Quarantine Agent
Setprinter.exe: Spooler Configuration Tool
Showacls.exe
Showperf.exe: Performance Data Block Dump Utility
Showpriv.exe: Show Privilege
Sleep.exe: Batch File Wait
Sonar.exe: FRS Status Viewer
Splinfo.exe: Print Spooler Information
Srvany.exe: Applications as Services Utility
Srvcheck.exe: Server Share Check
Srvinfo.exe: Remote Server Information
Srvmgr.exe: Server Manager
Ssdformat.exe: System State Data Formatter
Subinacl.exe
Tail.exe
Tcmon.exe: Traffic Control Monitor
Timeit.exe (documented in Readme.htm)
Timezone.exe: Daylight Saving Time Update Utility
Tsctst.exe: Terminal Server Client License Dump Tool
Tsscalling.exe: Terminal Services Scalability Planning Tools
Uddicatschemeeditor.exe: UDDI Services Categorization Scheme Editor
Uddiconfig.exe: UDDI Services Command-line Configuration Utility
Uddidataexport.exe: UDDI Data Export Wizard
Usrmgr.exe: User Manager for Domains
Vadump.exe: Virtual Address Dump
Vfi.exe: Visual File Information
Volperf.exe: Shadow Copy Performance Counters
Volrest.exe: Shadow Copies for Shared Folders Restore Tool
Vrfydsk.exe: Verify Disk
Winexit.scr: Windows Exit Screen Saver
Winhttpcertcfg.exe: WinHTTP Certificate Configuration Tool
Winhttptracecfg.exe: WinHTTP Tracing Facility Configuration Tool
Winpolicies.exe: Policy Spy
Wins.dll: WINS Replication Network Monitor Parser
Wlbs_hb.dll & Wlbs_rc.dll: Windows Load Balancing Server Network Monitor Parsers
Selasa, Desember 22, 2009
Kamis, Desember 17, 2009


Selasa, Desember 15, 2009
Compress file dengan Proteksi Password di Mac OSX
Seperti cerita dulu ketika menggunakan product Microsoft, saya biasa memakai WinZip/WinRar, salah satu fitur yang saya suka ada "password protected" :)
Nah, di Mac OS X pun kita bisa melakukan hal yang sama..
nah, pake terminal :D
tafas-macbook:~ tafa$ zip -e testong.zip coba.txt testing.txt
Enter password:
Verify password:
adding: coba.txt (deflated 54%)
adding: testing.txt (stored 0%)
tafas-macbook:~ tafa$ unzip testong.zip
Archive: testong.zip
[testong.zip] coba.txt password:
replace coba.txt? [y]es, [n]o, [A]ll, [N]one, [r]ename: y
inflating: coba.txt
replace testing.txt? [y]es, [n]o, [A]ll, [N]one, [r]ename: y
extracting: testing.txt
tafas-macbook:~ tafa$
oiya... command unzip tersebut bisa dilakukan untuk membuka zip file with password protected nya si WinZip lho... :p
Senin, Oktober 05, 2009
osql Utility MS SQL
osql Utility
The osql utility allows you to enter Transact-SQL statements, system procedures, and script files. This utility uses ODBC to communicate with the server.
Syntax
osql -U login_id [-e] [-E] [-p] [-n] [-d db_name] [-Q "query"] [-q "query"]
[-c cmd_end] [-h headers] [-w column_width] [-s col_separator]
[-t time_out] [-m error_level] [-I] [-L] [-?] [-r {0 | 1}]
[-H wksta_name] [-P password] [-R]
[-S server_name] [-i input_file] [-o output_file] [-u] [-a packet_size]
[-b] [-O] [-l time_out]
Arguments
-U login_id
Is the user login ID. Login IDs are case-sensitive.
-e
Echoes input.
-E
Uses a trusted connection instead of requesting a password.
-p
Prints performance statistics.
-n
Removes numbering and the prompt symbol (>) from input lines.
-d db_name
Issues a USE db_name statement when osql is started.
-Q "query"
Executes a query and immediately exits osql. Use double quotation marks around the query and single quotation marks around anything embedded in the query.
-q "query"
Executes a query when osql starts, but does not exit osql when the query completes. (Note that the query statement should not include GO). If you issue a query from a batch file, use %variables, or environment %variables%. For example:
SET table = sysobjects
osql /q "Select * from %table%"
Use double quotation marks around the query and single quotation marks around anything embedded in the query.
-c cmd_end
Specifies the command terminator. By default, commands are terminated and sent to Microsoft® SQL Server™ by entering GO on a line by itself. When you reset the command terminator, do not use SQL reserved words or characters that have special meaning to the operating system, whether preceded by a backslash or not.
-h headers
Specifies the number of rows to print between column headings. The default is to print headings one time for each set of query results. Use -1 to specify that no headers will be printed. If using -1, there must be no space between the parameter and the setting (-h-1, not -h -1).
-w column_width
Allows the user to set the screen width for output. The default is 80 characters. When an output line has reached its maximum screen width, it is broken into multiple lines.
-s col_separator
Specifies the column-separator character, which is a blank space by default. To use characters that have special meaning to the operating system (for example, | ; & < >), enclose the character in double quotation marks (“).
-t time_out
Specifies the number of seconds before a command times out. If no time_out value is specified, a command runs indefinitely; the default time-out for logging in to osql is eight seconds.
-m error_level
Customizes the display of error messages. The message number, state, and error level are displayed for errors of the specified severity level or higher. Nothing is displayed for errors of levels lower than the specified level. Use -1 to specify that all headers are returned with messages, even informational messages. If using -1, there must be no space between the parameter and the setting (-m-1, not -m -1).
-I
Sets the QUOTED_IDENTIFIER connection option on.
-L
Lists the locally configured servers and the names of the servers broadcasting on the network.
-?
Displays the syntax summary of osql switches.
-r {0 | 1}
Redirects message output to the screen (stderr). If you don’t specify a parameter, or if you specify 0, only error messages with a severity level 17 or higher are redirected. If you specify 1, all message output (including “print”) is redirected.
-H wksta_name
Is a workstation name. The workstation name is stored in sysprocesses.hostname and is displayed by sp_who. If not specified, the current computer name is assumed.
-P password
Is a user-specified password. If the -P option is not used, osql prompts for a password. If the -P option is used at the end of the command prompt without any password, osql uses the default password (NULL). Passwords are case-sensitive.
The OSQLPASSWORD environment variable allows you to set a default password for the current session. Therefore, you do not have to hard code a password into batch files.
If you do not specify a password with the -P option, osql first checks for the OSQLPASSWORD variable. If no value is set, osql uses the default password, NULL. The following example sets the OSQLPASSWORD variable at a command prompt and then accesses the osql utility:
C:\>SET OSQLPASSWORD=abracadabra
C:\>osql
-R
Specifies that the SQL Server ODBC driver use client settings when converting currency, date, and time data to character data.
-S server_name
Specifies the SQL Server installation to which to connect. The server_name is the name of the server computer on the network. This option is required if you are executing osql from a remote computer on the network.
-i input_file
Identifies the file that contains a batch of SQL statements or stored procedures. The less than (<) comparison operator can be used in place of -i.
-o output_file
Identifies the file that receives output from osql. The greater than (>) comparison operator can be used in place of -o.
If input_file is not Unicode and -u is not specified, output_file is stored in OEM format. If input_file is Unicode or -u is specified, output_file is stored in Unicode format.
-u
Specifies that output_file is stored in Unicode format, regardless of the format of the input_file.
-a packet_size
Allows you to request a different-sized packet. The valid values for packet_size are 512 through 65535. The default value osql is the server default. Increased packet size can enhance performance on larger script execution where the amount of SQL statements between GO commands is substantial. Microsoft testing indicates that 8192 is typically the fastest setting for bulk copy operations. A larger packet size can be requested, but osql defaults to the server default if the request cannot be granted.
-b
Specifies that osql exits and returns a DOS ERRORLEVEL value when an error occurs. The value returned to the DOS ERRORLEVEL variable is 1 when the SQL Server error message has a severity of 10 or greater; otherwise the value returned is 0. Microsoft MS-DOS® batch files can test the value of DOS ERRORLEVEL and handle the error appropriately.
-O
Specifies that certain osql features be deactivated to match the behavior of earlier versions of isql. These features are deactivated:
* EOF batch processing
* Automatic console width scaling
* Wide messages
It also sets the default DOS ERRORLEVEL value to -1.
-l time_out
Specifies the number of seconds before an osql login times out. If no time_out value is specified, a command runs indefinitely. The default time-out for login to osql is fifteen seconds.
Remarks
The osql utility is started directly from the operating system with the case-sensitive options listed here. After starting, osql accepts SQL statements and sends them to SQL Server interactively. The results are formatted and displayed on the screen (stdout). Use QUIT or EXIT to exit from osql.
If you do not specify a username when you start osql, SQL Server checks for the environment variables and uses those; for example, osqluser=(user) or osqlserver=(server). If no environment variables are set, the workstation username is used. If you do not specify a server, the name of the workstation is used.
If neither the -U or -P options are used, SQL Server attempts to connect using Windows NT Authentication Mode. Authentication is based on the Microsoft Windows NT® account of the user running osql.
The osql utility uses the ODBC API. The utility uses the SQL Server ODBC driver default settings for the SQL Server SQL-92 connection options, except for QUOTED_IDENTIFIER. osql defaults to setting QUOTED_IDENTIFIER OFF. Use the -I switch to set it on. For more information, see Effects of SQL-92 Options.
In addition to Transact-SQL statements within osql, these commands are also available.
Command Description
GO Executes all statements entered after the last GO.
RESET Clears any statements you have entered.
ED Calls the editor.
!! command Executes an operating-system command.
QUIT or EXIT( ) Exits from osql.
CTRL+C Ends a query without exiting from osql.
The command terminators GO (by default), RESET, ED, !!, EXIT, QUIT, and CTRL+C, are recognized only if they appear at the beginning of a line, immediately following the osql prompt. Anything entered on the same line after these keywords is disregarded by osql.
GO signals both the end of a batch and the execution of any cached Transact-SQL statements. When you press ENTER at the end of each input line, osql caches the statements on that line. When you press ENTER after typing GO, all of the currently cached statements are sent as a batch to SQL Server.
The current osql utility works as if there is an implied GO at the end of any script executed, so all statements in the script execute. Some earlier versions of isql would not send any statements to the server unless there was at least one GO in an input script. Any statements after the last GO would not be executed.
End a command by typing a line beginning with a command terminator. You can follow the command terminator with an integer to specify how many times the command should be run. For example, to execute this command 100 times, type:
SELECT x = 1
GO 100
The results are printed once, at the end of execution. osql does not accept more than 1000 characters per line. Large statements should be spread across multiple lines.
The user can call an editor on the current query buffer by typing ED as the first word on a line. The editor is defined in the EDITOR environment variable. The default editor is “edit”. You can specify a different editor by setting the EDITOR environment variable. For example, to make the default editor Notepad, enter at the operating-system prompt:
SET EDITOR=notepad
Operating System Commands
Operating system commands can also be executed by starting a line with two exclamation points (!!) followed by the command. The command recall facilities of Windows NT can be used to recall and modify osql statements. The existing query buffer can be cleared by typing RESET.
When running stored procedures, osql prints a blank line between each set of results in a batch. In addition, the “0 rows affected” message does not appear when it doesn’t apply to the statement executed.
Using osql Interactively
To use osql interactively, type the osql command (and any of the options) at a command prompt.
You can read in a file containing a query (such as Stores.qry) for execution by osql by typing a command similar to this:
osql /U alma /P /i stores.qry
The file must include a command terminator(s).
You can read in a file containing a query (such as Titles.qry) and direct the results to another file by typing a command similar to this:
osql /U alma /P /i titles.qry /o titles.res
When using osql interactively, you can read an operating system file into the command buffer with :r file_name. Do not include a command terminator in the file; enter the terminator interactively after you have finished editing.
Inserting Comments
You can include comments in a Transact-SQL statement submitted to SQL Server by osql. Two types of commenting styles are allowed: -- and /*...*/.
For more information, see Using Comments.
Using EXIT to Return Results in osql
You can use the result of a SELECT statement as the return value from osql. The first column of the first result row is converted to a 4-byte integer (long). MS-DOS passes the low byte to the parent process or operating system error level. Windows NT passes the entire 4-byte integer. The syntax is:
EXIT(query)
For example:
EXIT(SELECT @@ROWCOUNT)
EXIT(SELECT 5)
You can also include the EXIT parameter as part of a batch file. For example:
osql /Q "EXIT(SELECT COUNT(*) FROM '%1')"
The osql utility passes everything between the parentheses ( ) to the server exactly as entered. If a stored system procedure selects a set and returns a value, only the selection is returned. The EXIT( ) statement with nothing between the parentheses executes everything preceding it in the batch and then exits with no return value.
There are four EXIT formats:
* EXIT
Does not execute the batch; quits immediately and returns no value.
* EXIT( )
Executes the batch, and then quits and returns no value.
* EXIT(query)
Executes the batch, including the query, and then quits after returning the results of the query.
* RAISERROR with a state of 127
* If RAISERROR is used within an osql script and a state of 127 is raised, osql will quit and return the message ID back to the client. For example:
RAISERROR(50001, 10, 127)
This error will cause the osql script to end and the message ID 50001 will be returned to the client.
The return values -1 to -99 are reserved by SQL Server; osql defines these values:
* -100
Error encountered prior to selecting return value.
* -101
No rows found when selecting return value.
* -102
Conversion error when selecting return value.
Displaying money and smallmoney Data Types
osql displays the money and smallmoney data types with two decimal places even though SQL Server stores the value internally with four decimal places. Consider the example:
SELECT CAST(CAST(10.3496 AS money) AS decimal(6, 4))
This statement produces a result of 10.3496, which indicates that the value is stored with all decimal places intact.
See Also
Managing Security /*...*/ (Comment)
-- (Comment) RAISERROR
CAST and CONVERT
OSQL Command Prompt Utilities (SQL Server 2000)
Command Prompt Utilities (SQL Server 2000)
osql Utility
Topic last updated -- January 2004
The osql utility allows you to enter Transact-SQL statements, system procedures, and script files. This utility uses ODBC to communicate with the server.
Syntax
osql [-?] | [-L] | [ { {-U login_id [-P password]} | –E } [-S server_name[\instance_name]] [-H wksta_name] [-d db_name] [-l time_out] [-t time_out] [-h headers] [-s col_separator] [-w column_width] [-a packet_size] [-e] [-I] [-D data_source_name] [-c cmd_end] [-q "query"] [-Q "query"] [-n] [-m error_level] [-r {0 | 1}] [-i input_file] [-o output_file] [-p] [-b] [-u] [-R] [-O] [-X[1]] ]
Arguments
-?
Displays the syntax summary of osql switches.
-L
Lists the locally configured servers and the names of the servers broadcasting on the network.
-U login_id
Is the user login ID. Login IDs are case-sensitive.
-P password
Is a user-specified password. If the -P option is not used, osql prompts for a password. If the -P option is used at the end of the command prompt without any password, osql uses the default password (NULL).
Security Note NULL passwords are not recommended.
Passwords are case-sensitive.
The OSQLPASSWORD environment variable allows you to set a default password for the current session. Therefore, you do not have to hard code a password into batch files.
If you do not specify a password with the -P option, osql first checks for the OSQLPASSWORD variable. If no value is set, osql uses the default password, NULL. The following example sets the OSQLPASSWORD variable at a command prompt and then accesses the osql utility:
C:\>SET OSQLPASSWORD=abracadabra
C:\>osql
Security Note To mask your password, do not specify the -P option along with the -U option. Instead, after specifying osql along with the -U option and other switches (do not specify -P), press ENTER, and osql will prompt you for a password. This method ensures that your password will be masked when it is entered.
-E
Uses a trusted connection instead of requesting a password.
-S server_name[\instance_name]
Specifies the instance of Microsoft® SQL Server™ 2000 to connect to. Specify server_name to connect to the default instance of SQL Server on that server. Specify server_name\instance_name to connect to a named instance of SQL Server 2000 on that server. If no server is specified, osql connects to the default instance of SQL Server on the local computer. This option is required when executing osql from a remote computer on the network.
-H wksta_name
Is a workstation name. The workstation name is stored in sysprocesses.hostname and is displayed by sp_who. If this option is not specified, the current computer name is assumed.
-d db_name
Issues a USE db_name statement when osql is started.
-l time_out
Specifies the number of seconds before an osql login times out. The default time-out for login to osql is eight seconds.
-t time_out
Specifies the number of seconds before a command times out. If a time_out value is not specified, commands do not time out.
-h headers
Specifies the number of rows to print between column headings. The default is to print headings one time for each set of query results. Use -1 to specify that no headers will be printed. If –1 is used, there must be no space between the parameter and the setting (-h-1, not -h -1).
-s col_separator
Specifies the column-separator character, which is a blank space by default. To use characters that have special meaning to the operating system (for example, | ; & < >), enclose the character in double quotation marks (").
-w column_width
Allows the user to set the screen width for output. The default is 80 characters. When an output line has reached its maximum screen width, it is broken into multiple lines.
-a packet_size
Allows you to request a different-sized packet. The valid values for packet_size are 512 through 65535. The default value osql is the server default. Increased packet size can enhance performance on larger script execution where the amount of SQL statements between GO commands is substantial. Microsoft testing indicates that 8192 is typically the fastest setting for bulk copy operations. A larger packet size can be requested, but osql defaults to the server default if the request cannot be granted.
-e
Echoes input.
-I
Sets the QUOTED_IDENTIFIER connection option on.
-D data_source_name
Connects to an ODBC data source that is defined using the ODBC driver for Microsoft SQL Server. The osql connection uses the options specified in the data source.
Note This option does not work with data sources defined for other drivers.
-c cmd_end
Specifies the command terminator. By default, commands are terminated and sent to SQL Server 2000 by entering GO on a line by itself. When you reset the command terminator, do not use Transact-SQL reserved words or characters that have special meaning to the operating system, whether preceded by a backslash or not.
-q "query"
Executes a query when osql starts, but does not exit osql when the query completes. (Note that the query statement should not include GO). If you issue a query from a batch file, use %variables, or environment %variables%. For example:
SET table = sysobjects
osql /q "Select * from %table%"
Use double quotation marks around the query and single quotation marks around anything embedded in the query.
-Q "query"
Executes a query and immediately exits osql. Use double quotation marks around the query and single quotation marks around anything embedded in the query.
-n
Removes numbering and the prompt symbol (>) from input lines.
-m error_level
Customizes the display of error messages. The message number, state, and error level are displayed for errors of the specified severity level or higher. Nothing is displayed for errors of levels lower than the specified level. Use -1 to specify that all headers are returned with messages, even informational messages. If using -1, there must be no space between the parameter and the setting (-m-1, not -m -1).
-r {0 | 1}
Redirects message output to the screen (stderr). If you do not specify a parameter, or if you specify 0, only error messages with a severity level 11 or higher are redirected. If you specify 1, all message output (including "print") is redirected.
-i input_file
Identifies the file that contains a batch of SQL statements or stored procedures. The less than (<) comparison operator can be used in place of -i.
If input_file only specifies a file name, osql attempts to open a file with that name in the current folder. If the file is in another folder, input_file must contain the path to that folder, such as –i C:\MyFolder\MyScript.sql.
-o output_file
Identifies the file that receives output from osql. The greater than (>) comparison operator can be used in place of -o.
If input_file is not Unicode and -u is not specified, output_file is stored in OEM format. If input_file is Unicode or -u is specified, output_file is stored in Unicode format.
If output_file only specifies a file name, osql creates a file with that name in the current folder. To place the file in another folder, specify the path to that folder in output_file, such as –o C:\MyFolder\MyReport.rpt.
-p
Prints performance statistics.
-b
Specifies that osql exits and returns a DOS ERRORLEVEL value when an error occurs. The value returned to the DOS ERRORLEVEL variable is 1 when the SQL Server error message has a severity of 10 or greater; otherwise, the value returned is 0. Microsoft MS-DOS® batch files can test the value of DOS ERRORLEVEL and handle the error appropriately.
-u
Specifies that output_file is stored in Unicode format, regardless of the format of the input_file.
-R
Specifies that the SQL Server ODBC driver use client settings when converting currency, date, and time data to character data.
-O
Specifies that certain osql features be deactivated to match the behavior of earlier versions of isql. These features are deactivated:
• EOF batch processing
• Automatic console width scaling
• Wide messages It also sets the default DOS ERRORLEVEL value to -1.
-X[1]
Disables the ED and !! commands (see descriptions of these commands later in this topic) when osql is executed from a batch file. These commands are still recognized but osql does not execute them. Instead, osql issues a warning message and continues execution of the batch. If the optional argument 1 is specified, osql issues an error message and exits.
http://msdn.microsoft.com/en-us/library/aa214012%28SQL.80%29.aspx
Kamis, Oktober 01, 2009
Enabling and using the "root" user in Mac OS X
Enabling and using the "root" user in Mac OS X
http://support.apple.com/kb/HT1528
* Last Modified: October 20, 2008
* Article: HT1528
* Old Article: 106290
Summary
The root user in Mac OS X is disabled by default. Follow the steps in this article to enable and use it, if needed.
Important: If you are not familiar with the meaning of "root user," read this entire article to learn important precautionary information before using the root user. You must have an administrator account and password to complete the steps below.
Note: If you are using Mac OS X Server, root is already enabled by default. Advice contained in this article to disable root access when used infrequently does not apply to Mac OS X Server. It should remain enabled. For more information on related behavior, see this article.
Products Affected
Mac OS X 10.4, Mac OS X 10.3, Mac OS X 10.2, Mac OS X 10.1, Mac OS X 10.0, Mac OS X 10.5
About the root user
The user named "root" is a special user in UNIX-style operating systems that has read and write privileges to all areas of the file system. The root user should only be used for specific administration or monitoring tasks. After completing a task as the root user, you should log out of Mac OS X and log back in using a normal or administrator account. You should disable root access if you do not use it often.
The root user does not appear in Users or Accounts preferences.
Important notes
* Only the owner of a computer or its designated administrator(s) should have an administrator account or the root password.
* Any user with an administrator account can become the root user or reset the root password.
* A root password should be difficult to guess, containing both numbers and letters within the first eight characters.
* A root user has the ability to access other users' files.
* The root user has the ability to relocate or remove required system files and to introduce new files in locations that are protected from other users.
How to enable the root user
Mac OS X 10.5 or later
1. From the Finder's Go menu, choose Utilities.
2. Open Directory Utility.
3. Click the lock in the Directory Utility window.
4. Enter an administrator account name and password, then click OK.
5. Choose Enable Root User from the Edit menu.
6. Enter the root password you wish to use in both the Password and Verify fields, then click OK.
Note: If you are troubleshooting an issue that prevents you from logging in as an administrator, follow the steps in this article to enable the root user.
Mac OS X 10.4.x or earlier
1. Click the Finder icon in the Dock.
2. From the Go menu, choose Applications.
3. Open the Utilities folder.
4. Open the NetInfo Manager utility.
5. Click the lock in the NetInfo Manager window.
6. Enter an administrator account name and password, then click OK.
7. For Mac OS X 10.2 and later, choose Enable Root User from the Security menu.
8. For Mac OS X 10.0 and 10.1, choose Security from the Domain menu, then Enable Root User from the submenu.
9. If you have not previously set a root password, an alert box may appear that says "NetInfo Error," indicating that the password is blank. Click OK.
10. Enter the root password you wish to use and click Set.
11. Enter the password again for verification and click Verify.
12. Click the lock again to prevent changes.
How to log in as root
Use these steps for Mac OS X 10.2 or later:
1. If you are logged in, choose Log Out from the Apple menu.
2. If you are logging in from a list of usernames with pictures, click Other.
3. In the Name field, type: root
4. In the Password field, type the password you defined in the steps above.
Mac OS X 10.0 to 10.1.5
After enabling the root user, you must log out from Mac OS X and log back in as the root user. Logging in to Mac OS X from a list of usernames is the default behavior for later versions of Mac OS X. Logging in by typing your username in a text entry field is the default behavior in earlier versions of Mac OS X. You can choose either method in Login preferences. The root user does not appear in the list, so you need the text entry option. If necessary, follow these steps to change the login method to text entry:
1. From the Apple menu, choose System Preferences.
2. From the View menu, choose Login.
3. Click the Login Window tab.
4. Select the radio button for "Name and password entry fields."
Follow these steps to log in as root:
1. If you are logged in, choose Log Out from the Apple menu.
2. In the Name field, type: root
3. In the Password field, type the password you defined in the steps above.
How to disable the root user
Mac OS X 10.5 or later
1. Click the Finder icon in the Dock.
2. From the Go menu, choose Utilities.
3. Open Directory Utility.
4. Click the lock in the Directory Utility window.
5. Enter an administrator account name and password, then click OK.
6. Choose Disable Root User from the Edit menu.
Mac OS X 10.4.x or earlier
1. Open NetInfo Manager. It's in the Utilities folder.
2. Click the lock.
3. Enter the name and password for an administrator account, then click OK.
4. For Mac OS X 10.2 and later, choose Disable Root User from the Security menu.
5. For Mac OS X 10.0 and 10.1, choose Security from the Domain menu, then Disable Root User from the submenu.
What is the root directory?
It helps to know that the term root is used in two distinct ways: The "root user" and the "root directory." The root directory is the highest directory level of a disk. The files and folders you see when you open (double-click) your hard disk icon are the contents of that disk's root directory. A directory is represented graphically as a folder. You may know your home directory as your "home folder." The terms "folder" and "directory" are generally interchangeable.
A user's short name is also the name of his home directory.
The Finder and the Terminal show different contents for the root directory. Some items in the root directory are made invisible when viewed in the Finder. This reduces visual clutter and enhances simplicity. Users familiar with UNIX-style command line may use the Terminal utility to view everything in a directory.
How to enable anti-spam functionality on a Hub Transport server
Procedure To enable anti-spam functionality on a Hub Transport server
1.
Run the following command:
./install-AntispamAgents.ps1
2.
After the script has run, restart the Microsoft Exchange Transport service by running the following command:
Restart-Service MSExchangeTransport
Setting the InternalSMTPServers Parameter
In some organizations, the Hub Transport server role is installed on computers that don't process Simple Mail Transfer Protocol (SMTP) requests directly on the Internet. In this scenario, the Hub Transport server is behind another front-end SMTP server that processes inbound messages directly from the Internet. The Connection Filter agent must be able to extract the correct originating IP address from the message. To extract and evaluate the originating IP address, the Connection Filter agent must parse the Received headers from the message and compare those headers with the known SMTP server in the perimeter network.
When an RFC-compliant SMTP server receives a message, the server updates the message's Received header with the domain name and IP address of the sender. Therefore, for each SMTP server that is between the originating sender and the Hub Transport server, the SMTP server adds an additional Received header entry.
You must specify all internal SMTP servers on the transport configuration object in the Active Directory directory service forest before you run connection filtering. Specify the internal SMTP servers by using the InternalSMTPServers parameter on the Set-TransportConfig cmdlet. For more information about how to use the Set-TransportConfig cmdlet, see Set-TransportConfig.
When messages are received by the computer that runs connection filtering, the IP address in the Received header that does not match the IP address of an SMTP server in your perimeter network is assumed to be the originating IP address.
Bb201691.note(en-us,EXCHG.80).gifImportant:
For all anti-spam features to work correctly, you must have at least one IP address of an internal SMTP server set on the InternalSMTPServers parameter on the Set-TransportConfig cmdlet. If the Hub Transport server on which you are running the anti-spam features is the only SMTP server in your organization, enter the IP address of that computer.
Using Exchange Hosted Services
Spam filtering is enhanced by or is also available as a service from Microsoft Exchange Hosted Services. Exchange Hosted Services is a set of four distinct hosted services:
* Hosted Filtering, which helps organizations protect themselves from e-mail-borne malware, including viruses and spam
* Hosted Archive, which helps them satisfy retention requirements for compliance
* Hosted Encryption, which helps them encrypt data to preserve confidentiality
* Hosted Continuity, which helps them preserve access to e-mail during and after emergency situations
These services integrate with any on-premise Exchange servers that are managed in-house or Hosted Exchange e-mail services that are offered through service providers. For more information about Exchange Hosted Services, see Microsoft Exchange Hosted Services.
For More Information
For more information about how to manage anti-spam and antivirus features in Exchange 2007, see Managing Anti-Spam and Antivirus Features.
Tags What's this?: internal (x) smtp (x) Add a tag Add Cancel
Flag as ContentBug
Rabu, September 30, 2009
Troubleshooting SRP Connectivity problems
Troubleshooting SRP Connectivity problems


Posted 09-24-2009 at 04:00 AM by hdawg
Tags srp test
Nope ... not going to reinvent the wheel here. KB10922 - Unable to establish an SRP connection because the SRP is disabled. Had to do some troubleshooting today and this is a good one that just got updated too! Just remember: TCP port 3101 only needs to be opened outbound, not inbound!
Overview
The Server Routing Protocol (SRP) is disconnected, and it remains disconnected even after restarting BlackBerry Enterprise Server services. To diagnose the issue, perform the following tests:
Additional Information
The SRP might be disabled for the following reasons:
source: http://ow.ly/15QMZR
Overview
- Check that port 3101 is available.
- Run bbsrptest.exe from C:\Program Files\Research In Motion\BlackBerry Enterprise Server\Utilities. If there is an error in this utility, determine the point of failure.
- Run telnet srp.na.blackberry.net 3101.
- Go to Start > Program Files > BlackBerry Enterprise Server > BlackBerry Server Configuration.
- Click the BlackBerry Server tab and validate the SRP ID and key.
Additional Information
- Most SRP ID issues are caused by network issues. For example, the BlackBerry Enterprise Server can be disconnected because of a routing rule change, which stops all BlackBerry traffic.
- Multiple BlackBerry Enterprise Server instances are connecting connecting concurrently with the same SRP ID. For example, a test or new BlackBerry Enterprise Server instance is implemented while the existing one is running.
- It is a case of the 'five in one' rule. If the SRP connection is lost and five reconnection attempts are made within one minute, the SRP ID will be disabled. In addition to wireless network or firewall issues, this behavior can occur as a result of issues described in KB05368.
- The BlackBerry Enterprise Server is using a trial or temporary SRP ID that has expired.
- The BlackBerry Router is installed on a remote computer, and a communication problem exists between it and the BlackBerry Enterprise Server. If the BlackBerry Enterprise Server loses connection to the BlackBerry Router, the BlackBerry Dispatcher on the BlackBerry Enterprise Server will try to connect the SRP address itself. If the BlackBerry Router is still connecting to SRP, both the BlackBerry Router and the BlackBerry Dispatcher will connect using the same SRP ID simultaneously.
- The BlackBerry Enterprise Server is connecting through a non-transparent proxy server to the Internet. The proxy server might create multiple connections to the SRP and cause the SRP ID to be disabled.
- The network service between the BlackBerry Enterprise Server and the BlackBerry Infrastructure is interrupted. In this case, some data is still being transferred. For instance, the BlackBerry Enterprise Server tries to authenticate, and sends the SRP ID and authentication key to the BlackBerry Infrastructure. The request to authenticate is received, but the BlackBerry Enterprise Server does not receive a response from the BlackBerry Infrastructure, so it sends a new authentication attempt. If too many authentication attempts are sent within a short time period, the SRP becomes disabled.
- Information is coming from a different host, and the BlackBerry Infrastructure terminates the original session and creates a new one. Also, some proxy servers may offer a round-robin feature for load balancing, where the source address of the proxy may change. If too many sessions are terminated and re-created within a short time period, the SRP ID may be disabled.
source: http://ow.ly/15QMZR
Kamis, September 10, 2009
Configuring Exchange 2007 for Internet email
Update: Also check out this related post on dealing with certificate errors when users access Exchange from both the company's internal network as well as from the Internet:
http://thingsthatshouldbeeasy.blogspot.com/2009/02/certificate-errors-in-outlook-when.html
I had just installed and configured (at least I thought I did :) ) Exchange 2007. I sent a couple of test messages through from one internal account to another. Things seemed to be working well. But, when I tried to send a message to an external (Internet) address or receive a message, nothing happened. I did not get any obvious errors but the messages just did not get through.
It turns out that you must do some additional configuration on Exchange 2007 in order for it to allow inbound or outbound traffic from outside of its domain; that includes Internet messages. In order for Exchange 2007 to be able to send and receive Internet mail:
- Enter the Internet FQDN as an accepted domain
- Enter the Internet FQDN as an address policy ahead of the default policy for the local FQDN. This gives users two addresses: user@localFQDN and user@InternetFQDN and sets user@InternetFQDN as the default SMTP address. To test this, send an email from a user and check the user's from address. It should be user@InternetFQDN , not user@localFQDN. For example, if user jsmith in the mycompany.local domain sends the email, the from address should be jsmith@mycompany.com not jsmith@mycompany.local.
- Allow anonymous permissions on the default Receive connector. This allows people from the Internet to send email to the Exchange organization. If this is not done, emails from outside bounce with a message saying the sender was not authenticated. To test this, send an email from an external account, like Hotmail, to a user within the Exchange organization.
- Create a Send connector with the destination domain specified as "*". This allows the Exchange organization to send email to all domains. If this is not done, email sent outside the organization will be held by the server. The sending users will not receive any notice that their emails have not gone through. To test this, send an email to an external account, like Hotmail, from a user within the Exchange organization.
Selasa, September 01, 2009
BlackBerry eMail Flow pada BES
1. e-Mail diterima Exchange Server
2. Exchange Server mengirim paket UDP ke BES server (dalam hal ini BES telah terinstall MAPI)
note: Paket UDP tidak mendapat jawaban ACK, jadi exchange tidak pernah tahu kalo UDP tsb diterima atau tidak.
3. BES server menerima paket dan menggunakan MAPI untuk mengakases mailbox sesuai dengan permission nya
4. Global Filter dan User Filter diperiksa untuk meyakinkan bahwa email tsb untuk BB
5. Jika iya, Pending count user akan meningkat di BES server.
6. Email di-enkripsi dan di-kompresi untuk selanjutnya dikirim melewati firewall pada port 3101 ke BlackBerry NOC
note: enkripsi menyimpan PIN user untuk tujuan routing.
7. Pending count user di BES berkurang, dan sebaliknya Sent count meningkat.
8. Email tersebut akan masuk ke Sent Item folder di exchange server (user pengirim)
9. email terbaca oleh NOC lalu di routing ke Operator tertentu sesuai dengan terakhir kali PIN tsb terdaftar.
10. Operator menerima email dan meneruskan ke BB
11. email diterima BB, lalu dilakukan proses dekompresi dan dekripsi.
Rabu, Agustus 26, 2009
Bagaimana me-Reset Windows Administrator Password pada VMware.
Bagaimana me-Reset Windows Administrator Password pada VMware.
2 hari ini saya dihadapi oleh masalah salah satu VM di ESX 3.5, dengan OS Win2K3 Server tidak bisa Login dengan Domain User dengan alasan Domain Does Not Exist (?).
Ok, sepertinya ada some reason, dan perlu re-join domain. Nah, Login ke Local computer sebagai Administrator.
O'ow.... berbagai macam password dicoba namun tak jua berhasil. OMG.. Lupa Password, masuk melalui "safe mode" pun tetap minta password.
Akhirnya bisa setelah menemukan ISO "sakti", stepnya seperti di bawah:
1. Download Kon-Boot .iso image.
2. Masuk ke Virtual Infrastructure client, configure Virtual CDROM mounting ke Kon-boot ISO image. (Edit Setting)
3. Boot VM yang bermasalah tersebut. saat VMware BIOS muncul, tekan ESC untuk masuk ke boot menu. pilih boot from CD-ROM.
4. Saat the Kon-Boot splash muncul di layar, tekan Enter untuk boot ke Windows.
5. Saat muncul Windows login , ketik administrator sebagai user name, dengan password apapun/bebas/swakarepmu.
Password tsb hanya temporer, begitu masuk ke Windows, ubah Admin password dengan cara normal (Administrative Tools, etc).
Memindahkan Disk Storage location VM machine di VMware ESX 3.5
Hal tersebut berangkat dari salah satu VM (Win2K3 Server) yang tidak bisa boot-up dengan message di vmware.log sebagai berikut:
Aug 26 14:18:29.429: vcpu-0| [msg.hbacommon.outofspace] There is no more space for the redo log of Shaka1-000001.vmdk. You
Aug 26 14:18:29.429: vcpu-0| may be able to continue this session by freeing disk space on
Aug 26 14:18:29.429: vcpu-0| the relevant partition, and clicking Retry. Otherwise,
Aug 26 14:18:29.429: vcpu-0| click Abort to terminate this session.
Message tsb juga muncul jika dilakukan Power ON melalu VIC.
Hal yang terpikir adalah, bagaimana memindahkan salah satu VM yang ada di Disk tsb ke Disk lain sehingga VM bisa up.
Berikut langkah-langkah yang saya lakukan:
List semua VM yang registered di ESX server:
[root@esx-prod1 Shaka1]# vmware-cmd -l
/vmfs/volumes/4a553101-a2f6c723-e71c-00238b652f6b/Shaka1/Shaka1.vmx
/vmfs/volumes/4a553366-969ef2fa-e77a-00238b652f6b/Exchange/Exchange.vmx
/vmfs/volumes/4a553101-a2f6c723-e71c-00238b652f6b/Shaka2/Shaka2.vmx
/vmfs/volumes/4a553101-a2f6c723-e71c-00238b652f6b/VM_Sol10/VM_Sol10.vmx
/vmfs/volumes/4a553366-969ef2fa-e77a-00238b652f6b/lotekdb/lotekdb.vmx
Lakukan unregister untuk VM yang akan dilakukan "migrasi" disk storage:
[root@esx-prod1 Shaka1]# vmware-cmd -s unregister /vmfs/volumes/4a553101-a2f6c723-e71c-00238b652f6b/Shaka1/Shaka1.vmx
unregister(/vmfs/volumes/4a553101-a2f6c723-e71c-00238b652f6b/Shaka1/Shaka1.vmx) = 1
Pindahkan directory VM tersebut ke Disk Storage lain:
[root@esx-prod1 Shaka1]# mv /vmfs/volumes/esx-prod1:storage1/Shaka1 /vmfs/volumes/esx-prod1:storage2/
Lakukan register ulang untuk VM tsb:
[root@esx-prod1 Shaka1]# vmware-cmd -s register /vmfs/volumes/4a553366-969ef2fa-e77a-00238b652f6b/Shaka1/Shaka1.vmx
register(/vmfs/volumes/4a553366-969ef2fa-e77a-00238b652f6b/Shaka1/Shaka1.vmx) = 1
Check hasil register:
[root@esx-prod1 Shaka1]# vmware-cmd -l
/vmfs/volumes/4a553366-969ef2fa-e77a-00238b652f6b/Exchange/Exchange.vmx
/vmfs/volumes/4a553101-a2f6c723-e71c-00238b652f6b/Shaka2/Shaka2.vmx
/vmfs/volumes/4a553366-969ef2fa-e77a-00238b652f6b/Shaka1/Shaka1.vmx
/vmfs/volumes/4a553101-a2f6c723-e71c-00238b652f6b/VM_Sol10/VM_Sol10.vmx
/vmfs/volumes/4a553366-969ef2fa-e77a-00238b652f6b/lotekdb/lotekdb.vmx
Lakukan Power ON pada VM yang baru dipindahkan tsb (sebaiknya menggunakan VIC), akan muncul pertanyaan tentang UUID Location, pilih KEEP.
VM semestinya starting up dengan normal.
Kamis, Agustus 20, 2009
Shakalogic, ketika isyarat dan logika menjadi strategi 'perang'
Shakalogic, ketika isyarat dan logika menjadi strategi 'perang'.
Shaka adalah gerakan tangan ucapan salam yang dilakukan penduduk Hawaii dengan memperlihatkan ibu jari dan kelingking. Telunjuk, jari tengah dan jari manis ditekuk ke arah telapak tangan sementara bagian punggung tangan menghadap ke luar ke arah orang yang diberi salam. Untuk memperjelas maksud ke lawan bicara, isyarat shaka juga diberikan dengan pergelangan tangan yang digerak-gerakkan (bahasa Inggris: shaken sehingga konon isyarat ini disebut shaka).[1]
Isyarat shaka bisa bermakna OK, hebat, atau mahalo (bahasa Hawaii untuk terima kasih). Selain itu, shaka juga melambangkan "semangat Aloha" di Hawaii, yakni semacam sikap bersahabat dan saling pengertian antarberbagai kebudayaan yang dimiliki penduduk Hawaii. Isyarat ini juga dipakai untuk mengatakan halo atau sampai jumpa. Sewaktu berkendara di Hawaii, shaka bisa dipakai sebagai salam antarpengendara, ucapan terima kasih, atau permintaan maaf karena sudah mendahului kendaraan yang sebelumnya berada di depan.
Selain dilakukan orang Hawaii, isyarat ini juga dilakukan penggemar olahraga seperti berselancar, selancar layang-layang, papan luncur, selancar salju, dan skydiving. Di California, isyarat ini berarti hang loose. Tangan yang membentuk isyarat shaka juga berarti huruf Y dalam bahasa isyarat Amerika.
http://id.wikipedia.org/wiki/Shaka_%28isyarat%29
Shaka (kadang dieja Tshaka, Tchaka atau Chaka; ± 1787 – ± 22 September 1828) adalah kepala suku Zulu yang dianggap berjasa mengubah sukunya dari suku yang kecil menjadi awal suatu bangsa yang wilayahnya membentang sebagian Afrika bagian Selatan antara sungai Phongolo dan Mzimkhulu.
http://id.wikipedia.org/wiki/Shaka
He is widely credited with uniting many of the Northern Nguni people, specifically the Mtetwa Paramountcy and the Ndwandwe into the Zulu kingdom, the beginnings of a nation that held sway over the large portion of southern Africa between the Phongolo and Mzimkhulu rivers, and his statesmanship and vigour marked him as one of the greatest Zulu chieftains.[1] He has been called a military genius for his reforms and innovations, and condemned for the brutality of his reign.[2][3] Other historians note debate about Shaka's role as a uniter versus a usurper of traditional Zulu ruling prerogatives, and the notion of the Zulu state as a unique construction, divorced from the localized culture and the previous systems built by his predecessor Dingiswayo.[4] Research continues into the character, methods and influence of the Zulu king, who still continues to cast a long shadow over the history of southern Africa.
http://en.wikipedia.org/wiki/Shaka
Shaka adalah gerakan tangan ucapan salam yang dilakukan penduduk Hawaii dengan memperlihatkan ibu jari dan kelingking. Telunjuk, jari tengah dan jari manis ditekuk ke arah telapak tangan sementara bagian punggung tangan menghadap ke luar ke arah orang yang diberi salam. Untuk memperjelas maksud ke lawan bicara, isyarat shaka juga diberikan dengan pergelangan tangan yang digerak-gerakkan (bahasa Inggris: shaken sehingga konon isyarat ini disebut shaka).[1]
Isyarat shaka bisa bermakna OK, hebat, atau mahalo (bahasa Hawaii untuk terima kasih). Selain itu, shaka juga melambangkan "semangat Aloha" di Hawaii, yakni semacam sikap bersahabat dan saling pengertian antarberbagai kebudayaan yang dimiliki penduduk Hawaii. Isyarat ini juga dipakai untuk mengatakan halo atau sampai jumpa. Sewaktu berkendara di Hawaii, shaka bisa dipakai sebagai salam antarpengendara, ucapan terima kasih, atau permintaan maaf karena sudah mendahului kendaraan yang sebelumnya berada di depan.
Selain dilakukan orang Hawaii, isyarat ini juga dilakukan penggemar olahraga seperti berselancar, selancar layang-layang, papan luncur, selancar salju, dan skydiving. Di California, isyarat ini berarti hang loose. Tangan yang membentuk isyarat shaka juga berarti huruf Y dalam bahasa isyarat Amerika.
http://id.wikipedia.org/wi
Shaka (kadang dieja Tshaka, Tchaka atau Chaka; ± 1787 – ± 22 September 1828) adalah kepala suku Zulu yang dianggap berjasa mengubah sukunya dari suku yang kecil menjadi awal suatu bangsa yang wilayahnya membentang sebagian Afrika bagian Selatan antara sungai Phongolo dan Mzimkhulu.
http://id.wikipedia.org/wi
He is widely credited with uniting many of the Northern Nguni people, specifically the Mtetwa Paramountcy and the Ndwandwe into the Zulu kingdom, the beginnings of a nation that held sway over the large portion of southern Africa between the Phongolo and Mzimkhulu rivers, and his statesmanship and vigour marked him as one of the greatest Zulu chieftains.[1] He has been called a military genius for his reforms and innovations, and condemned for the brutality of his reign.[2][3] Other historians note debate about Shaka's role as a uniter versus a usurper of traditional Zulu ruling prerogatives, and the notion of the Zulu state as a unique construction, divorced from the localized culture and the previous systems built by his predecessor Dingiswayo.[4] Research continues into the character, methods and influence of the Zulu king, who still continues to cast a long shadow over the history of southern Africa.
http://en.wikipedia.org/wi
BlackBerry Eterprise Service:: How It Works
1. Pastikan Nomor terdaftar sebagai BES (BES provisioned) di Operator.
2. BES Admin melakukan registrasi (add user) dan meng-aktifasi password.
3. Dari BB, Setup Wizard -> Email Setup -> Register Work Mail with BES -> Masukan email dan password (provided by BES Admin) -> activation server address (kosongkan) -> klik BB menu/trackball --> Activate.
4. Akan terjadi proses activasi (IT Policy, Adress Book, etc).
5. BB activated with BES. and ready to use.
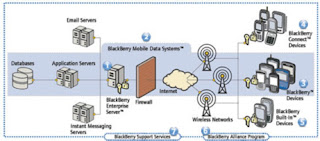

Selasa, Agustus 11, 2009
How to create ISO file from CD/DVD on OS-X / Mac
from terminal:
#drutil status
Vendor Product Rev
HL-DT-ST DVDRW GS21N SA17
Type: CD-ROM Name: /dev/disk1
Sessions: 1 Tracks: 1
Overwritable: 00:00:00 blocks: 0 / 0.00MB / 0.00MiB
Space Free: 00:00:00 blocks: 0 / 0.00MB / 0.00MiB
Space Used: 62:21:33 blocks: 280608 / 574.69MB / 548.06MiB
Writability:
#diskutil unmountDisk disk1
#dd if=/dev/disk1 of=/file_name.iso
#diskutil mountDisk disk1
guratan catatan yang begitu banyak menumpuk dan semakin berantakan
selalu malas untuk memulai, bolak balik ganti nama blog...
sepertinya harus mulai dari awal lagi, begitu banyak catatan...begitu banyak yang semakin terlupakan.
terlambat, mudah2an memang lebih baik daripada tidak sama sekali (?).
sepertinya harus mulai dari awal lagi, begitu banyak catatan...begitu banyak yang semakin terlupakan.
terlambat, mudah2an memang lebih baik daripada tidak sama sekali (?).
Langganan:
Komentar (Atom)